To explain, I play role-playing games, Dungeons & Dragons to be precise. "The Chapter" is an adventuring party in the game which I run. The players, as strange a group as the characters they play, found a picture of a tattoo which they thought would make an excellent emblem for their team. Could it be turned into an embroidery? I thought it could be adapted and the challenge was laid.
I am NOT going to share a picture of the original inspiration yet. Instead I'm going to post progress reports on this page and allow it to appear by, as one of The Chapter called it, 'Time Lapse Embroidery'.
BIG RISK.
I have never yet created a design than moved smoothly from the paper to the canvas, so this could go horribly wrong. There may be heart rending scenes, moments of high drama and intimations that I have reached the depths of despair. I will however try to hold off on the curse words.
One of the first things I did was try and find the copyright holder, if there was one, but the only link I discovered and e-mailed has not replied. No reply does not necessarily mean that the original is not copyright, so on to plan two, change the design while keeping the general idea that The Chapter liked. Out with the pencils and paper (and the absolutely indispensable eraser).
The players liked the swirls and shades on the original design so in my design I retained the idea but used the shading as a starting point, developing it into the names of the characters in the game.
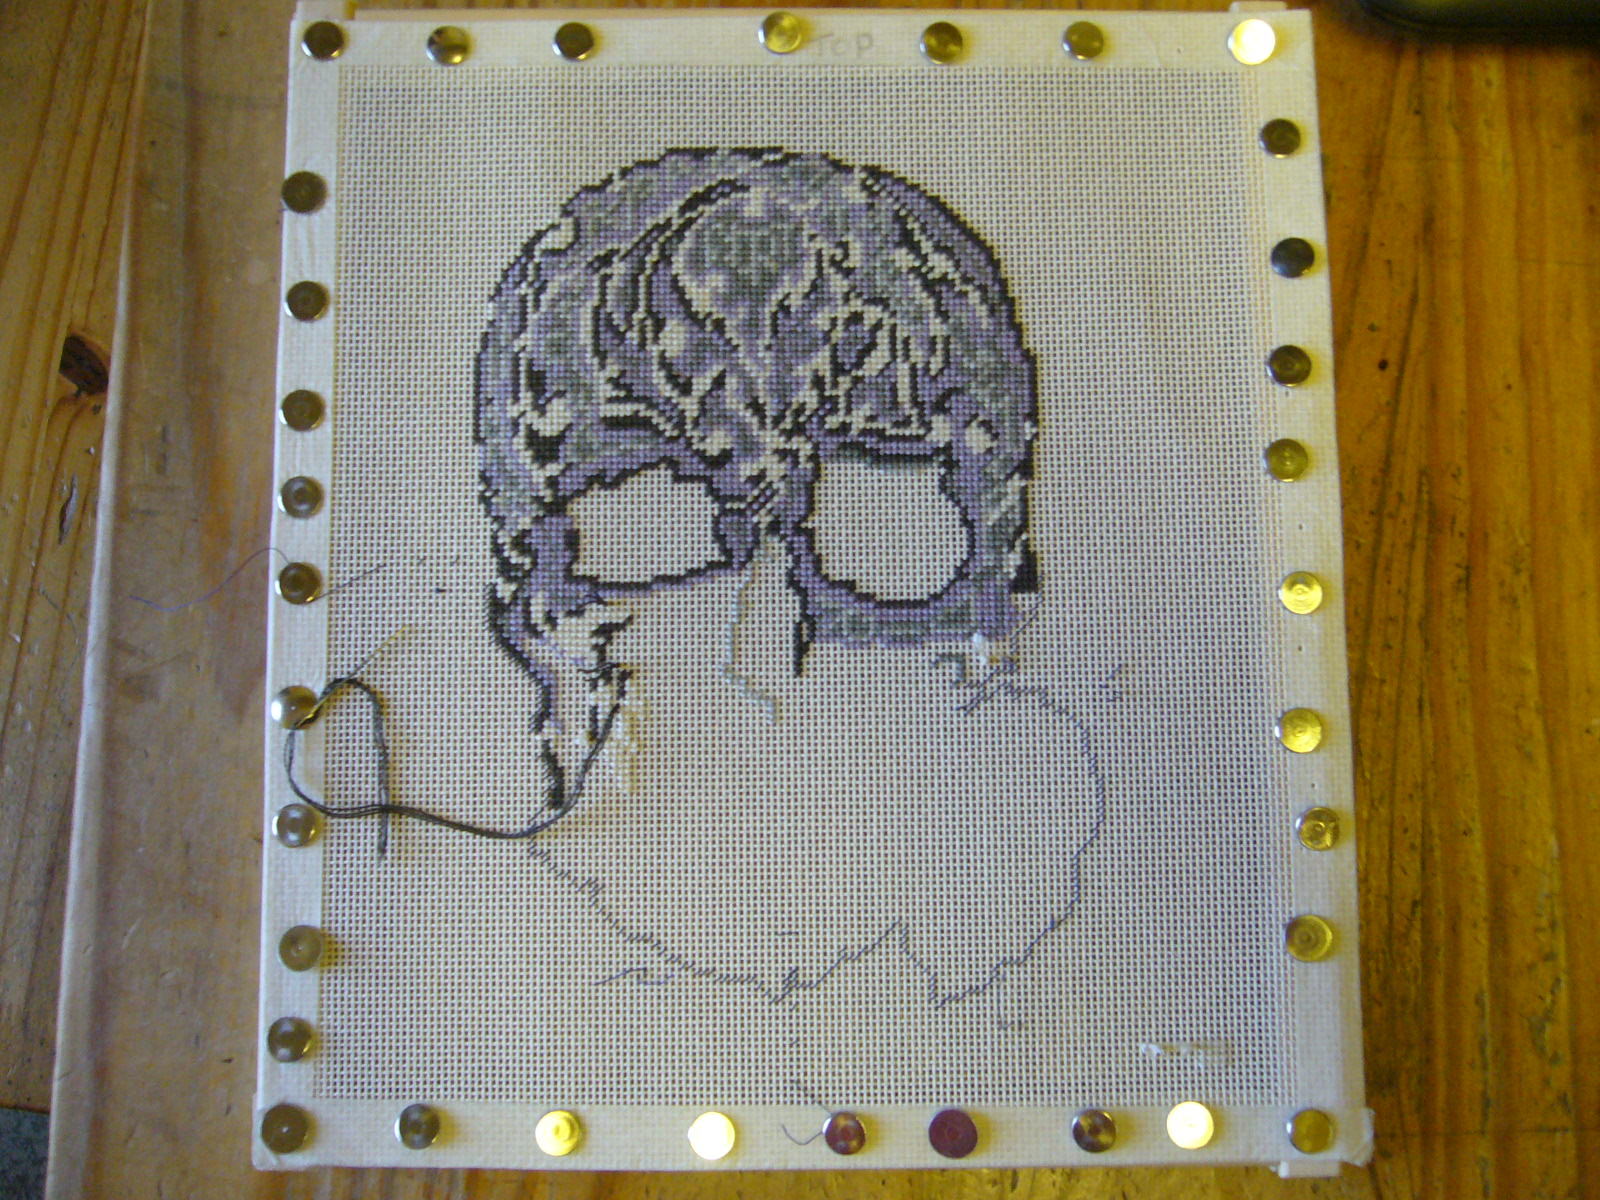
I began work on the design in October 2018. It took 19 hours over eleven days to complete the design, order the threads and prepare the canvas. I decided to work this on 18 count ivory canvas, mainly using Soi d'Alger in a grey palette.
While I waited for the silks to arrive I mounted the canvas on stretcher bars using thumb tacks. I like to keep my canvas drum tight as I believe that this reduces distortion and makes it easier to 'finish' the completed piece. Once the canvas is on the bars I always start by marking TOP at the top of my canvas. In many cases the top of the design will be obvious but it's good practice in respect of geometric or abstract designs so I have made it a habit. I also make sure that I have tacks in the corners.
Why? It saves counting. I take a length of quilting thread and run it from corner to corner. Where they meet is close enough to the centre of the canvas for 'rock 'n' roll'. From the centre, using a length of quilting thread and leaving a long trailing end, I stitched a centre line up to the top. I repeated this from centre to the left hand side, then, using to long ends (so that I only had one thread going from top to bottom or side to side) I completed the vertical and horizontal centre lines. To aid future counting, I made each stitch five treads long.
Why did I use quilting thread? I find that it is easy to see it against the canvas and it is much easier to pick out when I no longer need it than any other way of creating guidelines.

With the centre lines and the diagonals marked I then transferred the outline of my design from the design sheet onto the canvas. Again, I used quilting thread to do this. I used lengths of about 2'. Longer and I find tends to want to twist and catch, shorter and I feel as though I am constantly having to cut new threads. It's amazing what a difference that 6" can make.
It's always gives me a little glow of success when I have worked all the way round and my stitches meet where they should. I think at this point it looks a bit like an Imperial Stormtrooper with a respirator on the side of his helmet.

It took 3 hours to attach the canvas to the stretcher bars, find the centre, mark the vertical and horizontal and outline the design. I was ready to start stitching as soon as the silks arrived.
My stitching plan was to work the majority of the Ecru areas first to provide a framework, then to work from top left to bottom right. As a rule, I always try and work whites and paler colours first. I'm not sure it's quite as important with silks but with wool there is always the possibility of fibre drag and there is nothing worse than finding a loose red fibre in the middle of a section of white stitches.

After three hours of stitching I'd got this far.

Six hours in and the first name, Kara, is stitched. It may not appear very clear in the picture, as I've said before, I'm not a photographer. I'm not sure yet if the colour selection is going to work but I shall persevere.

Eight and a half hours and I have completed the Ecru in the top half of the design.

After twelve and a half hours of stitching. Having added Ivan, the party Druid, down the left hand side I feel a little better about the colour choice, but there's still time to regret it.


There are days when I seem to stitch faster than others. This is 'The Chapter' after twenty hours. I'm starting to like the interplay of the greys with the Ecru. I'm even quite taken by the way they change under different lights. So far I've only miscounted a couple of times and have only had to rip out a dozen stitches. My stitching angel must be watching over me.

Progress continues. Here I am at the stage of adding another name. Mort, otherwise known in the party as DOCTOR MORT (definitely to be spoken in upper case with all the respect due to a Necromancer). For various reasons Mort's name had to be in the centre at the top.


Twenty five hours in. I have removed some of the guidelines as they were getting in the way of the stitching. The next name is Sukanne. At some point soon I am going to have to make a decision about the eyes!

Some days it goes well, which is nice. I have now been embroidering this for thirty hours and in the last five I seem to have rushed ahead and completed Sukanne and the rest of the top of the design. I'm not sure if Sukanne's name is very clear. I may have to revisit that bit. I have also started the final name, Gellamdir, a short, slim, agile and dextrous elf. Not at all like the player.

Thirty-five hours. Being slinky and dextrous, Gellamdir's name sort of slides down the side and beneath the eye of what I'm sure you've worked out is a skull. All I'm saying on that is that if you choose a skull as your emblem you're probably a pirate.

So far so good. I have added the names of all the players' characters, just a little outlining to do around Gellamdir. I'm a little concerned that I appear to have made no major bloomers yet, only a few small miscounts which were easily rectified. I have still some decisions to make. What am I going to do with the eyes? How am I going to 'Finish' this? I think I'm unlikely to make a final decision on that until the rest is done, but maybe I'll applique it onto some sailcloth (or maybe not).
Back to the right cheek. If I can, I prefer not to work over previously stitched areas. It reduces the chances of messing, mussing or otherwise abusing the floss you just spent an age laying.
It's not easy on a piece like this where the design swirls and curves and the colours change every few stitches. The best way I have found to approach it is to treat it as many small areas and unless I can draw my thread across the back in a logical way, end it and start again.
What do I mean by 'drawing'? Taking the thread across the back of the embroidery to start the next section of the same colour. I would only do this if I can take it in a vertical or horizontal line and behind five or fewer canvas intersections, and if it crosses stitched areas I weave it through so that there are no long snaggable bits on the back. I'd avoid a diagonal draw of any more than two intersections. Why? I worry about lumps on my back side.

And this is my backside. Moving swiftly along,

Moving swiftly along, the picture above is the front at the same stage.

Fifty hours and I am down to the teeth. There have been a number of miscounts, frog-stitches and 'fixes', but progress has been surprisingly smooth (so far).

Another five hours of stitching and I have completed the skull down to the upper teeth. There are a number of loose threads because I'm not totally happy with the green Kreinik. I'm not sure it's giving me the coverage I want, but that may just be my technique. I'm also not sure about the light red in the flower head. As you can no doubt see, it's meant to have a rose between its teeth and I want the rose to bling out against the greys of the skull.
A thought on using two strands of Kreinik braid. To get it to lie properly you have to keep it under constant tension, otherwise it will make a break for freedom!

The rose is done! It's stitched in a Kreinik braid, a Soie d'Alger and a Neyon Rays so that it has a harsh edge to it, with some lighter 'sparkly' petals and some dull petals. The stalk between the teeth is a Kreinik braid too. There was some frogging and ripping involved. What looks good on paper does not always look good on the canvas so some parts of the flower head had to be fiddled with to improve the look. It took twelve hours just to stitch the flower head.
Now I need to get on with the lower jaw so that it doesn't drop the rose.

And by the end of 2018, it has teeth and a lower jaw. The eyes are going to be a challenge as I don't want them to dominate the piece, but I don't want them to fade into the rest of it. I'm working on options and leaning towards 'bloodshot'.
I tried a number of different ways of stitching the eyes. A set of greys increasing in darkness to the centre didn't look right. I tried thread blending using a red metallic filament but I found that the filament either hid under the other threads or looked too bright. In the end I went with a single strand of the red Soie d'Alger with two strands of the second lightest grey, randomly stitched to look like the lines of bloodshot eyes.

Well that worked. Noises of approval from the intended recipients. Next is the background and finishing. I had all sorts of ideas about that, but it has to fit in with the other artworks on the wall, so it's going to be framed. I'm thinking something that looks a bit like bones, bamboo maybe?
After the hiatus of the Ursine Invasion Force it was time to get on with the background. I had wanted to applique the skull onto sailcloth, turn it into a sail and display it hanging from a mast and spar, but that was just not going to fit in its new home so I had to compromise. The skull and rose had to stand out so the background had to be light.

I was still taken (obsessed) by the idea of a sail. The image in my mind was of the morning sun catching on a sail with the skull pained on it. You know how adventure stories go, the poor defenceless locals are being attacked by nasty pirates when out of the dawn comes a ship full of heroes come to save them. Or given this lot, maybe they're the pirates coming out of the dawn. So the sail idea stuck.
The background is in bands of two different shades of Ecru, to look like the lengths of canvas of a sail. I'm not sure it's actually going to work. The two shades may be just too close together.
I have spent twelve and a half hours on the background, miles of basket-weave, and am about half way through, so another dozen or so hours should see that part finished.
It seems an age since my last update on The Chapter. I've not been ignoring it (or you) but some things take as long as they take. Once I had finished the background I had to spend time searching for missing stitches. I found four, then I handed it to Jane-Beth and she found another one and a couple of loose threads, all of which had to be sorted out.


I do my own lacing, partly because I've had issues in the past with framers and I've heard all sorts of horror stories from other people, including one framer who glued the embroidery to the backboard (You What? I hear you say!). The main reasons, however are, firstly that my framer knows he doesn't have to do it (he hates lacing too), secondly if it's squint then it's my fault and thirdly there's no question as to the finished size. Since a poor finish can practically destroy a piece, it's only fair that I make it quite clear what I want.
Not including the mounting and lacing, it has taken me 120 hours to stitch The Chapter. I enjoyed most of it; some of it didn't work as well as I had hoped, some of it worked better. The unexpected arrival of a red Splendour amongst the petals of the rose was one of those 'good error' moments.
Now it's going off the visit my friends at Renaissance Framing.
And now it's back.
This is the design the group found;


And this is the group that asked for it.

They've seen it, they've said the like it, and now they have to wait until September to get to keep it.
THE END
No comments:
Post a Comment