Wednesday, 11 November 2020

Or nue flower

I don't often go on classes in the UK, but in 2017 I did take the opportunity of a class on Or Nue, at the  Scottish National Portrait Gallery. The class was taught by Helen McCook, a Royal School of Needlework graduate.

The design is based on a detail from the painted wall decorations on the pillars of the upper gallery. If you have the opportunity, the Scottish National Portrait Gallery is worth a visit just for the architecture and decoration. Of course, it's also full of portraits!


For some obscure reason I did not record the notes and timings I usually keep on pieces. No idea why. The gold is Japanese Gold #2, the flosses are DMC stranded cotton using one strand, stitched on blue satin. The design is only about 5 inches across. Helen taught us various types of fillings and explained how they could be used to emphasis shape and depth.
It was a fun class, with lots of interaction and lots of discussion about influences, from Arts & Crafts, back through Restoration and Jacobean to the Eastern influences brought in by the arrival of Indian and Japanese fabrics and embroidery.

This was never meant to be one of those pieces I would hang on the wall, but once finished it needed protected. I didn't want to place it under glass or just put away in a drawer and forgotten about, and I did want it to be portable but safe. I found the perfect storage for it, an I-Phone box.

Thursday, 8 October 2020

Kaitlyn

Who or what is a Kaitlyn?

It's 2017, and she's a who. Kaitlyn is the grand-daughter of the lovely woman who cleans my Dad's house. So how did I get involved in making something for her? It's a bit of a convoluted story.
'Gran', as I'll call her, is only supposed to do the heavy cleaning, but we all know that she spends longer with Dad and does more for him than she gets paid for. Elder Brother, otherwise referred to as The Major Domo was trying to find some indirect reward that she might accept as a recognition of this. Had we any ideas? Well I did.

Occasionally, when across to visit him in my capacity as Head Gardener (for those who remember The Herbs, they call me Bayleaf) 'Gran' would be there and we would chat about all sorts of things. She was fascinated that I embroidered and knew stuff about Japanese things as Kaitlyn was 'into' Japanese things and was decorating her room in a Japanese sort of style, loved Kimono and so on. It was coming up to a Birthday (or maybe it was Christmas) and 'Gran' was trying to find something in a Japanese style for Kaitlyn who wanted 'a Japanese Scroll' to decorate her wall. I suggested to The Major Domo that I could stitch a scroll using Japanese embroidery techniques, which 'Gran' could give Kaitlyn as a unique gift.
Offer made, offer accepted.

First, of course, I had to come up with a design. I decided that a simple scroll with her name in a Japanese script would be just the thing. I looked up her name on a few translation sites and found Kaitlyn in Kanji and Katakana. It looked very 'heavy' in Kanji, but the Katakana had a lighter feel to it, more suited for a young girl (she was just approaching her teens). 
Translated, Kaitlyn means 'purity' so my design had to have a clean and unencumbered look. I looked at name 'chops', which led me to the idea of a simple border in red with the Katakana in black, edged with couched silver, on a white background.
I drew out my design and offered it to TMD.

"Go for it," he said
I did. I decided that the best fabric to use would be Shioze as it is quite heavy, but easy to stitch on (the prominent weave helps with maintaining the angles of the stitches). Then I had to frame up. As I had intended from the start, this was to be stitched in the manner of Traditional Japanese Embroidery, so the cotton end pieces had to be stitched to the silk Shioze and then wound drum tight and stretched on the frame. Once the silk was mounted, I made a stencil of the design on tracing paper and attached it using magnets while I copied a running stitch outline of the design.


If you've never seen one before, the frame may look a little different to what you're used to. The point is to keep the silk as tight as possible during the stitching process, so the rollers at the end are split to give added grip and the fabric is stitched along the sides to ensure that it is well stretched. Incidentally, Traditional Japanese Embroidery is worked from the side.
Having transferred the pattern, 


I was ready to start stitching.
Following the rules, I began with the Katakana. These were stitched in black flat silk which was either worked as flat silk or twisted by hand by me where I wanted to use a twisted silk. Each symbol was worked in a different stitch.


Then the border was added. The tissue paper is there to protect the embroidery. It always ends up a bit tatty and torn as I only uncover that part of the piece I am working on in that stitching session.


Then the silver was couched round each of the Katakana, and gold on the inside and outside of the border.


And still it wasn't finished. 

When the stitching is done, the frame gets turned over for the first time. The manner of starting and ending threads in Traditional Japanese Embroidery means that there is no weaving through the back, and no big knots. Once it's on its back it needs to be starched, steamed and dried. This has to be done very carefully as the starch should only go on the back of the embroidery, otherwise it might stain the fabric.

The finishing touch, once it was off the frame, was to turn it into a scroll by attaching it to some heavy (furnishing) fabric and a hanger.


It took me 60 hours to design and stitch Kaitlyn, which measures approximately 14" x 24". I enjoyed working on it as much as I enjoyed the look of pleasure on "Gran's" face when I gave it to her.

Also, 'Gran' comes up trumps by providing an absolutely unique present.

Friday, 25 September 2020

Dynamic Sisters and Handbags

 Still in New Orleans, I took three classes. 

The first was "Dynamics of Teaching", led by Val McAleenan. Unsurprisingly it was about teaching Needlepoint. I'm not sure that I will ever teach embroidery in a formal way, but I thought it would be interesting to hear a teacher talk about the inter-relationships that happen in an embroidery class. As someone who has in the past trained people in basic IT skills and IT Security (and who tries to be a good boy in class), I was aware of the different types of students found in the business environment, and was, in a way not surprised to find that all of the same types attend embroidery classes. The big difference is that in a business environment the attendee has generally been sent, while in a Needlepoint class, the attendee has chosen to be there and has paid good $$$ for the privilege, so the way you treat the difficult or disruptive has to be, if not different, perhaps a bit more patient. 
I've done a little ad-hoc teaching since then, and I always let my student or students work at their own pace. You can't do this is a class of more than four or five, so you, as the teacher, have to be prepared to sit after class with the slower stitcher to make sure they know what they're doing and how to do it. I don't think there can be anything worse for a student than to be sitting without an idea of what to do. 
At one point it brought back to my memory my first French lesson. As usual, having returned from holiday in Singapore, I ended up in the school hospital for a week. Long story, put briefly, I had an allergy to the school issue vests which made me come out in spots, which the school assumed was some evil foreign disease I had picked up in the mysterious East, so I was hauled off to the school hospital for two weeks. Having been released, one of my first classes was French, of which I had absolutely no knowledge. The teacher (an ex-Polish cavalryman of WWII vintage) immediately rounded on this new face and asked me a question - in French. I had no idea. I shrugged, said I didn't understand, he got angry, he shouted at me. It took me some moments to understand that he was actually speaking English - yes, his English accent was like something out of a bad comedy movie. I became, in his eyes, the class failure, and from then on I dreaded French.
Lesson? Take care how you speak to students. A few badly chosen words can destroy confidence in seconds.
I hated French from that moment, but I'd like to put it on record that I had great respect for 'The Wee Pole' as he was nicknamed, as a man. You may have heard the story of Polish Cavalry charging German tanks in 1939. He was one of those cavalrymen. You can't not respect that.

Well, that was a long story for a one day class. My second class was with Janet Zickler Casey, and was called "Let The Good Times Roll!" (Or "Laissez Les Bon Temps Rouler!" - which I still pronounce in a Polish-French accent.)


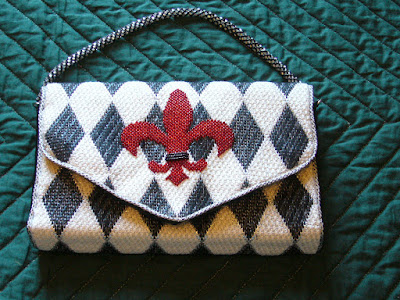
As you can see, it's a handbag. The Fleur-de-lis is beaded, as is the handle. The class included teaching us how to make the beaded handle as well as how to stitch the body of the handbag. What drew me to this class was the teacher, whom I had already met a number of times. Jane-Beth had taken a few classes with her and raved about how good she was and how much fun her classes were.
On the first day of class, yes, me in my kilt as usual, the lady next to me asked, in a friendly manner, why a man would take a class to make a beaded handbag. I couldn't resist it, "a boy just can't have enough handbags," I replied. That broke the ice as the rest of the class realised I was just as nuts about Needlepoint as they were.
It was indeed a fun class, with lots of discussion around colour choices and personalising the design. There was lots of laughter, lots of stitching, and lots of discussion about colour, stitches and much else. You'll meet the handbag again.

The third class I attended in New Orleans was "Sisters" by Nancy Cucci. Obviously NOLA was my 'beading' year.


I chose this class for a number of reasons. I loved the design, particularly the repetition of the same stitches, but not in the same order, in the large squares. To me it made the point that in a family the siblings may all have started with the same genetic material, but we all become distinct individuals. I liked the colour selection too, the dark balancing the light, the overlaps of the squares slipping into companionship rather than opposition and the background pulling them all together like the members of a single household.
I had been wary of beads for a long time, but I wanted to take a class with Nancy. She was a great teacher, very relaxed and and yet attentive to every student. Thanks to her I am no longer afraid of small shiny things. It was great fun and I really enjoyed every minute I spent working on "Sisters". I still haven't decided which Brother, I have three, deserves this.
Sisters measures 5½ x 10½ inches and is worked on 18 count canvas. It took me 75 hours to stitch.
If you like the look of "Sisters", you can find another version in Melita's blog, Melitastitches4fun. There's a link at the top of the page.

Monday, 14 September 2020

Things We Do On Our Holidays

We attend the ANG Seminar as often as we can manage. Apart from the classes and the shoppertunities, we like that it moves around, which means that we get to see a different place each year. The days at Seminar are filled with classes, events and meetings, so we always try and arrive a few days early to do touristy stuff.

We walked where we could, and we found the Streetcars. That was fun, even if we did get on the wrong one and end up at the terminus. Still, we saw dozens of fine looking houses and beautiful gardens. Walking, I had the chance to admire the wrought-iron work on the balconies of houses. I particularly liked this one.


We also found our way (a fairly short walk from our hotel) to the World War II museum. It is big, it is impressive, and it is educational. It's not all 'Blood and Glory', with sections on The Home Front, war industry and a massive archive, as well as many items of the machinery of war. There were tanks, Jeeps, aeroplanes and trucks, and right in the main entrance, a Higgins Boat. And next to the main entrance was a really good Forties themed cafe.
I had heard of Andrew Higgins. Eisenhower is said to have referred to him as 'the man who won the war'. Higgins designed and built the thousands of landing craft required for the Pacific campaign and the Allied landings in North Africa and Europe.
Obviously the people of New Orleans think highly of him as one of their 'Sons' because the street that leads to the Museum is called:


We also visited the Confederate Museum. It was much smaller, perhaps more personal because of that, but equally interesting. Such places may be frowned upon by many, but I think it's important that they exist in some form or other to remind us that history has two (or more) sides, and that to forget it is to repeat it.

Then there's the food. We went with a group of needle pointers to a well known, I might say famous, restaurant that has been there since forever. The food was incredible, a total melt in the mouth experience, and they had good Scotch Whisky. I think I did cause a bit of a stir. The MD, a very nice chap, seemed to find this man-in-the-kilt quite attractive (maybe he just wanted to find out if the rumours about what Scotsmen wear under their kilts are true). Then there was the young lady with her partner who kept looking, and whose expression indicated that she wasn't sure, ours being a group of ladies of a certain age, whether I was a man in a skirt or a hirsute woman (I have a moustache.)
And there was a traditional Jazz band playing in the street outside. As the saying goes, I thought I'd died and gone to heaven.

But what about the classes? Of course I took classes and I'll write about them next time.

Saturday, 5 September 2020

Man The Builder

 In 2015 we visited Myrtle Beach, in 2016 we ventured further into The South. The American Needlepoint Guild Seminar 2016 was to be held in New Orleans. How could we not go? New Orleans! The name alone conjures up a vision of the exotic, yet at the same time, pictures of the aftermath of Katrina. So off we went, Jane-Beth and me, and a bottle of Auchentoshan, and of course my exhibition piece. 

My entry for the 2016 Exhibit was "Man The Builder", a design I had started on in July 2015. If you were at Myrtle Beach, you might have seen a mad-man sitting on the floor in the shop with a big design sheet, picking out threads. Yep, that was me. 


Original work must be submitted to the Exhibit accompanied by an Artist's Statement. That read:

The inspiration for "Man The Builder" came from a variety of sources; pre-Reformation stained glass, the warm gold of the stone of the Scottish Border Abbeys, our need for places of contemplation and ritual whatever our beliefs and 'Cathedral Window' quilting (which I could never get the hang of). "Man The Builder" shows the growth of places of ritual from the first standing stones, through the Henge, to the great cathedrals and monasteries of the Middle Ages.
We know from Archaeology that men built temporary shelters close to their sacred places at times of festival and, later, small permanent houses, probably for their Shaman, priests or rite leaders. 
As beliefs and needs changed, these buildings replaced the Henge and were slowly enlarged, or new buildings erected, growing in size and importance, the culmination being the great cathedrals.
My object was to show this process as it might have been illustrated in an old stained glass window, with pictures of the evolving edifices engraved into small panes of glass.
I chose to use silk and metals to emulate the warmth of the sandstone and the glow and reflections of light through the glass and onto the stone. I chose to stitch the mullions in Soie d'Alger as I felt it gave the warm effect I wanted. The central part of each mullion was padded to show the curve of the stone and I used wave stitch on the outer border to reflect the long chisel marks left on the stone by the builder as he shaped it with his rudimentary hand tools.
Old glass is uneven in both texture and colour so I chose to show this using a substantial layer of Neon Rays couched with silver or gold to emulate the speckles often seen in early church glass. I tried various methods of adding the "etched" buildings, none of which I found satisfactory until I found a collection of coloured lighting gels in my mother's stash. I found that I could obtain the desired effect of etching over glass by drawing the building on the gel, cutting out the outline and attaching it to the "glass".

Later, I was offered a different take on what I had stitched:
When we were simple folk, our God (I use this as shorthand for any form of deity or belief system) was with us and all around us. When we became settled, our God stayed with us and the holy person made his abode close to the place we considered most sacred to our God. Then the priests took over and built bigger and bigger houses and locked our God in them.
It was a lesson to me that people might see something in my work which I did not intentionally put there. It doesn't worry me. If someone finds something of meaning to them yet which I didn't deliberately put there, they are welcome to take it away with them. If nothing else, it shows that they took the time to consider what they were looking at.

"Man The Builder" was stitched on 18 count white mono canvas, using Soie d'Alger silk floss for the mullions and borders. The padded areas were stitched with three layers of padding cotton before the silk was laid over the top. The central motifs or 'glazed areas' are in Neon Rays. The highlights on the mullions and the 'lead' round the 'glass' are couched Japanese #8 gold and silver while the bosses at the points of the mullions are a Heavy Passing Gold we inherited from somewhere. The buildings were drawn onto yellow stage lighting gel using an indelible black pen and attached using small stitches of black thread.
The stitched area is 12" on each side and it took me 190 hours to design and stitch. I had a successful Exhibit. "Man The Builder" was awarded Third Place in Class, a Judges Choice Ribbon, and the "Creative Inspiration" Award.

I don't usually include lots of pictures of a piece, but it has been suggested to me that people like to see the progress of a piece of work. I don't take many pictures as I go, but here are a few I took when working on "Man The Builder".


My Doodle Cloth. The test of the padding is in the top right. If I was doing this again I would consider making the padding stitches longer and maybe deeper.


Padded Mullions (white) completed mullions in golden brown Soie d'Alger.


The full piece with padding.


The finished piece.


The ribbons.

Thursday, 20 August 2020

Myrtle Beach and The Tree of Life

 I had to look it up in our atlas. I knew where South Carolina was, but I'll admit that until the American Needlepoint Guild said Seminar 2015 would be in Myrtle Beach, I'd never heard of it. Having got there, it reminded me very much of the west coast of Scotland. Of course, there's only the Atlantic between them. The main similarity was that it was wet. 
I think it rained pretty much every day we were there. There is a big difference though! The rain was warm! We got as far as the beach one day. "Did  you go for a swim?" asked one of our acquaintances. "Swim? If I'd known how warm the Atlantic could be I'd have brought a bar of soap and had a bath."
That was also the day we went hunting for a 'Starbucks'. It wasn't that we wanted coffee, but I have friends who collect Starbucks mugs and I always try and take them one from my travels. We also visited a surf-shop. What an explosion of colour! In the UK surfers wear wet suits, not colourful Lycra outfits.

We did other touristy things, including a visit to Hopeswee Plantation where I saw Spanish Moss for the first time. (I took this picture from Trip Advisor as it was much better than any of my attempts.)
It was an interesting tour, filled with detail about the history and the inhabitants, and about rice growing in The Carolinas.


I impressed by knowing who Mary Chestnut and Verena Davis were. I've even read parts of Mary Chestnut's diaries.

But we were there for the embroidery. I showed Endless Golden Knot and Polar Bear's Claw. I was awarded the Silk and Metal Ribbon for the former and an Honorable Mention for the latter, so a successful Exhibit for me. It pleased my teacher too. Endless Golden Knot was designed and taught by Michele Roberts (see my 10th July blog), and she was also the designer and teacher of Tree of Life.

I chose to do Tree of Life because I wanted to do a memory piece for my father, who suffered a stroke early in 2015 and was showing signs of dementia.


Tree of Life is worked on Congress Cloth and uses Kreinik Gold, beads, crystals and gold bullion metals. It measures 16" by 18" and it took me 75 hours to stitch.
The original had various religious symbols on the red circles (the fruits of the tree), but as this was meant to hang by my father's chair where he could touch it, I redesigned these to motifs that would mean something to him and might help him retain his memories.
Working clockwise from the bottom left, the symbols I chose are:
A trowel. My Dad always had an interest in Archaeology.
Burning Bush. He was brought up in the Church of Scotland, whose 'logo' is the burning bush from Exodus and whose motto is Nec Tamen Comsumebatur.
Five Pointed Star. Because he and Mum loved their annual visits to the USA.
Square and Compass. The symbol of Freemasonry.
Fouled Anchor. My dad spent many years in the Royal Navy.
A Cross. Dad was a Church of Scotland minister.
5 and Male. To remind him of his five sons. (When we lived in Singapore the local Chinese ladies were impressed - 5 children, all boys.
MP, Their initials intertwined, Peter and Margaret,
Boys Brigade Emblem. He was involved with that organisation for many years.
Davy Lamp. That was to remind him of his childhood in a small Fife mining village.

My Dad is 93 now, and has limited (and not very accurate) memory, but he is still in his own home and Tree of Life hangs next to his chair, close enough that he can touch it.
The constant touching may be bad for the embroidery, but if it helps him, I'm happy with that, and if I wanted I could always stitch another version.

Maybe I should start one for myself?

Friday, 7 August 2020

(Polar) Bears Claw

Those who have been following my blog will know that I occasionally make quilts. This isn't one.

Someone recently asked me where I got my inspiration from. The best answer I could give was "Anything and everything. I never know when it will hit and what will trigger an idea until it comes to me." That's the way it works for me. As Thomas Edison said of Genius, as the light bulb went on above his head, it's 1% inspiration, 99% perspiration. 
I find that when the inspiration comes, the initial idea can be sketched out as a first draft in a few minutes. After that comes the blood, sweat and tears. I know where I am, and I know what I want to achieve, but once I get the image it can take hours to draw a final version which I think meets my idea.
Then I have a drawing. Keep going, there are still the threads and stitches to select. Usually I have already decided on colours, but then there's the colour balance to be considered. Once I have the drawing, the colours balanced in my mind, and the stitches applied to areas, I can then translate the drawing into a chart. What about size? Mostly, I find, I don't have to think too much about that as the design will tend to indicate what size the finished piece should be.

What about the Polar Bear?
I did promise one in the title, so here is my Polar Bear:


The inspiration came from a previous quilt, "6 Bears +1", which had a Bear's Claw pattern round the border. "You could do something with that in Needlepoint," I thought. 
The initial sketch was a single Bear's Claw, like the quilt. The next version extended it to four paws reducing in size, with a partial border, as though it was the corner of a quilt.
For this piece, the title came next. (Polar) Bear's Claw. Why Polar Bear? Who knows, I just decided Polar Bear, maybe because Polar Bears, like male embroiderers, are an endangered species.
It was the title which decided the colours I would use. Obviously, Polar Bears are white(ish) so there was a predominance of off-white, The live on ice floes and the floes are surrounded by the sea, so the sea had to be a dark blue, the ice a pale blue.
Jings! What next? The Stitches. The paws, being the obvious large areas, needed to be white and suggest a certain furriness so I used a woven stitch to give them bulk. When it came to charting them I decided that the size of the woven stitch should remain the same for each 'paw print' and only the area of the 'paw print' should reduce. I also decided that the claws should be couched Kreinik silver. Why? It just felt right. 
As this was based on a quilt pattern I looked for a stitch that had a woven-fabric quality to it for the background. If you don't know this one, it's called Darmstadt Stitch and it's dead easy. It also covers the area at quite a rate once you get in the swing of it.
Having in my mind already decided that the sea would be the border, or was it that the border would be the sea, I sought something smaller and tighter than the Darmstadt and went for a Scotch Stitch with a zig-zag in the same off white as the paws. I deliberately left the ends 'hanging' to imply that this was a corner of a quilt.
It took some time to balance the stitch sizes to the drawing and chart the final design, but by taking the time to count it all out on graph paper, it does mean that the chart is a close reflection of the finished article. I say close, because there is almost always that point where a stitch, as charted, really just doesn't look right and you have to wing it. All you've got to do next is stitch it.

I have to admit that this is one of the few pieces I have designed where I haven't made some fairly major alterations to the stitch plan just because what looks good on paper doesn't work on canvas.

(Polar) Bear's Claw is 5" square and was mounted in a 12" square cold steel frame with a pale grey mount. I used Soie d'Ager silks and a Kreinik metallic silver throughout. It took me 50 hours to design and stitch. (Polar) Bear's Claw was exhibited at the American Needlepoint Guild Seminar 2015.

The last thing I stitched was a two row border that matched the mounting board. I like to add a tent stitch 'framer's friend' to all my needlepoint. My framer says that it gives a smoother transition between the embroidery and the canvas and makes for a better looking mount, I do it because if the mount is just slightly off, the framers friend can disguise it.

And breathe.

Thursday, 23 July 2020

Phase IV

But not the movie.
Does anyone actually remember the movie? Seventies, Sci-fi, ants doing strange things and a mad ecologist.

No, this is Phase IV of my occasional forays into Traditional Japanese Embroidery or Nuido.

I took up Nuido for a number of reasons.
Partly it was because I understood that I needed something with strict rules and disciplines to counterbalance my tendency to let my own designs run too far ahead of my ability. I like to push my boundaries and try something new in each piece I design, but there are times when I try and pile in too much 'new'. One well executed new idea is better than three or four poorly executed.
Partly it was because I liked some of the designs and colours and I could see that if I learned to use them properly I would see how they could fit into my own work.
Partly it was because Jane-Beth needed a 'numpty' (know nothing/idiot) to practice her teaching technique on.

So, Phase IV. This Phase IV piece is called "Embroidery Sculpture" or, in Japanese, "Shishu Chokoku". It is a Japanese Embroidery Center design.
The flowers and leaves are worked in Japanese flat silk. In Japanese Embroidery only a flat silk is used, and where a twisted thread is required, the practitioner has to twist it themselves. That's fun (or not). To twist a thread, you have to split the required thickness in two, twist half of it in one direction and hold the end between your teeth while to twist the other half - of course the first half has twist tension on it and if you let it go it will spring away in some uncontrollable direction, curl up on itself and then you have to start again. Then you have to twist the two halves together in the opposite direction.


"Embroidery Sculpture" Copyright Japanese Embroidery Center, Atlanta

"Embroidery Sculpture" is less about the flowers and leaves and more about the metals and precision couching. The gold and silver threads are non-stitchable, They are too thick to go through the silk fabric on which they lie, so they have to be couched, and the couching is part of the design so it has to be accurate to give the angles the correct shapes.

I started "Embroidery Sculpture" in April 2010, and finished it in February 2015. Sometimes you just have to not hurry! In real time, it took 166 hours, or 21 days based on an 8 hour stitching day. It measures 14" by 18" not including the frame.

I exhibited this at the Royal Highland Show in 2015 and was awarded 1st in Class and The Agnes Bryson trophy for best piece of needlework in the exhibition. BIG YAY!

I don't often talk about value, but the lady presenting the awards asked me to explain it to her how it was done, then she asked how much it would cost if it were for sale. Without a blink I said £2000. But that was back in 2015. I think she was a little shocked.
I do that to people. If they don't stitch, they don't always understand how long these things take, or how long it takes to gain the experience in order to do them.  Yes, it only took 166 hours, but what about the hundreds, perhaps even thousands, that you spend learning how to do it?
Thought for the day, put a realistic value on your needlework. Not that I sell anything, but if asked, I generally consider that twice the minimum wage is a good start, then adjust upward for difficulty, originality or just for the sheer hell of it.

Friday, 10 July 2020

Watching Chicago Go By

As is my habit at ANG Seminars, I signed up to do a few shifts at the 'Hospitality Desk'. It's always good for a laugh and a joke and a gossip, and you learn a bit about the place you're in and advice on what you should try and see 'while you're in our city'. In Chicago we were constantly told that the place we MUST visit was the Art Institute.
We went. It was hot, it was Labor Day weekend and the queue went along the front of the building, up the side, and then doubled back.
Neither of us is good standing in the sun for three-quarters of an hour, so we had a look round the shop and ran away.
What we did find to amuse and fascinate was the Chicago Architecture Center.

We only saw the ground floor, but it held us fascinated. There was a model of central Chicago, with a light show changing the time of day, and there were big screens carrying street-cam views of the city and all sorts of data. You could stand and watch the road and rail delay reports as they were reported, even the number of potholes reported and repaired. They repair potholes quick in Chicago. If you want to sit, relax and watch a whole city go by in real-time, its worth a visit, but my favourite part was the model.


Despite all the changing lights and moving screens, it was actually quite restful.

I did do some embroidery. I took a class in Goldwork, "Golden Endless Knot", designed and taught by Michele Roberts. There was pre-work, so I arranged for it to be sent to the hotel, to be collected on arrival. I'm not saying there was a lot of pre-work, but there was.
By the time I'd done the pre-work I didn't want to see another Montenegrin Stitch EVER!

Class was great. We learned how to create height through padding and how to handle different golds. We stretched and laid purl and chipped bright. Michele taught us about different types of gold,  how they were best used and what other uses they might be put to. She also entertained us with a fund of stories and asides.


The swag is highly padded and covered in 'chippings', the line visible on top of the swag is of Swarovski crystals. This piece is full on bling, and much as I had to struggle with the Montenegrin Stitch, it is still one of my favourite pieces.

"Golden Endless Knot" was designed and taught by Michele Roberts. It measures about 14" by 11", and it took me 106 hours to stitch.

Friday, 26 June 2020

Ammonite

In 2014 I took a fossil to the American Needlepoint Guild Seminar in Chicago.
I also took Jane-Beth.

Chicago is big and tall, and The Magnificent Mile is a bit breath-taking. That might have been something to do with having to walk with my neck twisted up to look at the architecture. The city is filled with new glass monoliths, but the older 'skyscrapers' in the centre are a glory of early 20th Century architecture. They're not just buildings, they are works of art. I particularly liked the reliefs on the walls, so I'm putting in pictures of a few of my favourites.


To appreciate Chicago, you really need to accept the crick in the neck.

Of course the main reason for going to Seminar was to stitch, to learn and to exhibit my latest piece of needlepoint.
In 2014 I exhibited "Ammonite"

"Ammonite" started life as a spiral doodle. It was a boring meeting. The spiral was joined by some curved lines and it reminded me of an ammonite. I love the shape of the ammonite, the regularity of the shape and the blending of colours where different chemicals have seeped into the shell and fossilised it.
When I got home I decided to up-scale it into a design roughly based on this fossil:


At an early stage I decided that although Ammonites have a regular mathematical progression in the expanding size of their compartments, my maths was never going to be up to the challenge, so I decided to go for effect rather than accuracy. My intention was to capture the spirit of the ammonite and produce a piece of work that was instantly recognisable as the fossil, not an exact copy of any specific fossil.


Ammonite measures 6" by 6" and took 100 hours to design and stitch. It is worked in basketweave on 18 count pewter canvas. The outline and the dividing lines between the chambers are done in Kreinik braids. The infill of the chambers is Soie d'Alger. I used six different colours on the infill of the chambers. To achieve the look of the chemicals seeping into the fossil I blended my threads. As the colours fade into each other I started with four strands of one colour, then three of that and one of the next, then two and two, then one of the first and three of the second.
The background, the 'mother stone' also uses thread blending to define the variety of shades and colours found in any piece of stone.

I was quite pleased with this, and so must the judges have been as they awarded it 2nd in Class. It's always nice to get the recognition.

Ammonite was later published as a chart, with instructions and stitch guide, in Needlepointers, September 2015, Volume XLIII, Number 5

Thursday, 18 June 2020

Inspiring Leith, The Final Stitch

Early last year we started a self-help craft group, Leith Friendly Crafters, at Leith Library under the auspices of Inspiring Leith. The group was advertised as being for all skill levels and none. The idea was that local people who wanted to learn to knit, crochet, quilt or embroider could come along and someone in the group would teach them the basics.

In June last year my friend Hannah suggested that it would be a good idea if there was something people could try at Leith Festival, and could I design something?
Well, yes.
That was the start of "Inspiring Leith".


This is Hannah, at Leith Festival, hiding from the rain. The framed canvas has the basic design drawn on it, waiting for anyone to show an interest. It poured wet all day, but Leithers are hardy folk. Rain, snow, hail, thunder, they will still go to the Festival.

I started this with no real colour plan or stitch guide, only a book of stitches and a box of different colours and types of thread - wools, perle, variegated and self coloured. The point was to encourage and enthuse, and I felt that giving them the choice people would feel more part of the project.
To further encourage them, I made a note of the given names of everyone who chose a colour, stitch and letter and promised that they would all get a mention when the hanging was completed.
After the festival, our group continued to meet in Leith Library and I continued to invite passers-by to have a shot, choose a colour and stitch a little.


As you can see, it brought out some interesting colour combinations, and surprisingly little white and green, the colours of Hibernian, the local football (soccer) team. Once the letters and the tower were completed I had to decide how it was to be finished.

As it was to be a hanging, and frequently moved, I didn't want it to be too heavy and bulky, so I decided that a skip stitch in a neutral shade was the best option. Luckily, I had in hand a good deal of a fawn Appletons Crewel wool which, on testing, took nothing away from the lettering or the tower.


I finished it with a colourful bias binding.

I was impressed by some of the stitch choices, and though I thought some of them might not be that appropriate to the letter, I went with them, showing them how to do the stitch and giving advice where it was needed. Here are some close-ups of the chosen stitches.


I had promised that everyone who worked on this would have their name recorded, so I wrote them on a large sheet of paper, pinned and tacked it to a piece of calico and stitched through it using back-stitch, then I attached it to the back and put on the binding and hanging loops.


So there you are, Angela, Louisa, Georgia, Gordon, Anna-Maria, Christine, Hannah, Muhammed, James, Eva, Eshal, Alice and Sanya. When you see Inspiring Leith hanging, you can point to it and say "I did some of that," and if anyone doubts you, your name is on the back.


Next week I shall be handing this to Hannah, and I believe that its first outing will be at the Inspiring Leith stall at the old police box at Shrubhill (Leith Walk) on Saturday 27th June (11.00 am to 2.00 pm).

I didn't count how many hours this took as it was a community project, but it was great fun and I met some lovely people. It was, incidentally, a great way to use up part of my 'Stash'.
So why not boogie down to your local library and see if they have any craft groups, and if they don't, start one.
I certainly intend to be back at Leith Library when Lockdown is lifted and Jane-Beth lets me out again.

Thursday, 4 June 2020

Daffodils

As "The Doctor" might say, it's a timey-wimey thing.
Somewhere in the Covid Lockdown I have lost a season. There I was, tending my Dad's garden through the winter, watching the first snowdrops and daffodils poking their green stems above the ground, and suddenly we're fewer than three weeks away from the longest day.
So I missed the mass of daffodils, golden or otherwise, that seem to erupt from every part of his garden.

Not that I've been idle during Lockdown, there's a whole big bit of stitching to be completed by 2021, and I'm working on 'Inspiring Leith'. I want to finish it in the next two weeks.

Maybe it was my mother's love of daffodils that inspired me to take "Daffodil Hill" by Lois Kershner at the 2013 ANG Seminar in Philadelphia.


As I'm sure I've stated previously in this blog, I don't do 'realistic' designs, by which I mean I don't design landscapes or figures. Maybe I'm afraid to try, or maybe its because when I get an idea and start to scribble, the outcome tends to be a little towards the abstract. Of course that might be down to my inability to draw a straight line with a ruler.
But I do like to have a go at other designers' landscapes.

"Daffodil Hill" was the first of two 'landscape' classes I took at this Seminar. Apparently, Daffodil Hill is a real place, with field after field of different types of daffodil. I'm sure Mr. Wordsworth would have been highly impressed.
What lessons did I take away from this class? Lois showed us how to show depth of field with shades and stitches and I learned how to make different sizes of French Knots to enhance the three dimensional effect. Honestly, I'm beginning to enjoy French Knots. Perhaps I need to see a therapist!

Daffodil Hill measures 7" by 5" and is on 24 count canvas and took 49 hours to stitch.

Wednesday, 20 May 2020

Wisteria Wednesday

Eight weeks into Lockdown. I miss some of my usual activities, but we are all finding ways to live with the restrictions.
I'm missing my visits to my Dad, and I'm missing getting out into his garden and getting some good healthy exercise. When they lift the Lockdown I may have to hire a flock of sheep to eat their way across the lawns. We speak on the 'phone, but it's not a substitute for physical presence and I'm looking forward to being allowed to travel again.

How am I surviving without going stir-crazy? Well I've always been crazy, so I'm a natural for surviving this period of confinement, but I do get taken out for a walk round the industrial estate across the road. It's quiet, with plenty of space for 'social distancing' should we happen to meet anyone else.
Jane-Beth christened it "Wisteria Wednesday" because one of the things we like to do is walk past the side of the Ferrier Pumps Ltd building. They have a beautiful garden along the front and side of the building and on a Wednesday we like to take a walk along the road to see how the Wisteria is coming along. Thus, Wisteria Wednesday.
We are really impressed that Ferrier have created this little haven of beauty. Why not drop into the 'News' section of their website, https://www.ferrierpumps.co.uk/news and scroll down to the entry about the garden. Kudos to Ferrier for their garden and their community sponsorship.

My photograph, their Wisteria
And where does embroidery get a look in? I don't know yet, but maybe I'll break one of my own rules and design something based on their garden.

I have of course been doing lots of stitching. Every Monday morning and Thursday evening our craft group gets together for an hour or so by Zoom (thanks to Bethany Christian Trust and Inspiring Leith) and I work on my Inspiring Leith piece.


I have reached the background! I have decided that to keep the weight down so that it can be a hanging or a banner, the background will be a diagonal skip stitch in two directions. The finished embroidery will measure 15½ by 17½ inches.
At this rate I shall have it finished by the time the Lockdown restrictions are lifted to a stage where Jane-Beth feels it is safe for me to go out alone.
So, Christmas then.

Thursday, 14 May 2020

How many sleeps 'till Christmas?

In this case, -2334.

I stitched "Santa" and "Mrs Santa" in 2013 for the American Needlepoint Guild Auction of that year. All funds from the auction go to the Education Fund. This funds projects to make the public more aware of Needlepoint, to encourage them to try it, and to raise its profile as an art.

These were painted canvases, without a stitch guide, so although I had to pretty much follow the general colours indicated, I was able to choose my own stitches.


I have to admit now that I enjoyed stitching these little fellows so much that I forgot to record just about everything about them. I do recall that I mostly used DMC Medici, and the background is Soie d'Alger. I made their bags from some Christmas material I had on hand, and filled them with small sewing items. Each had a pair of scissors, some threads, not all of them visible in my pictures, and a roll of 'something to stitch on'.

Sometimes it's fun not to think about time and just let your needle run with your imagination.

Friday, 8 May 2020

Auspicious Quilts

We now slip back in time to the last months of 2012.

Late in the year, my brother announced that one of his daughters was expecting a baby. Well, that family thing kicked in and I said I would make a cot quilt for the latest addition to the burgeoning mob that is his family. About a week later, one of my team asked to see me privately and advised me that she was going to have a baby. Office tradition required some recognition of the event.
Two cot quilts then.

Not that there was any hurry, the big event was still some months away and you can't give something like a cot quilt until the mother is, as they used to say, 'safely delivered of a child'.

Not that I designed two different quilts. There is a limit!
I decided to go with an oriental design using the stylized bat stencils I cut for "Batique Out of Hell".
In Japanese and Chinese mythology, bats and the numbers 3 and 5 are considered auspicious, with 3x5 being especially lucky. The design shows three columns of five bats.

Auspicious I

Auspicious II
 Both central panels were created using English Piecing, basting each piece to a paper template, then stitching them together by hand. The papers were then removed and the bats appliqued to the top of the quilt. The wadding and backing were basted to the front and then quilted together.
Heavy, close quilting can make a quilt quite stiff and hard. As these were cot quilts, I did only a minimum of quilting. I quilted the outline of each bat 'in the ditch' and expanded the lines to create an inner border, probably best seen in Auspicious II so that there was a wide band of softer, unquilted fabric round the edges, before binding it with soft satin bias binding.

The quilts were presented only after the births, with a wish that the child have a Long life, Good luck and Happiness.

Auspicious I and II were worked together and took 140 hours.
And I still have the templates.

Thursday, 30 April 2020

Inspiring Leith

Back in June last year I was one of the founders of a small stitching group that met on a Thursday afternoon in Leith Library as part of the Inspiring Leith Project. As part of the project I designed "Inspiring Leith".


This was specifically designed to encourage anyone coming into the library to 'have a go'. It was always going to be colourful, and of course size matters. It's much easier for newcomers to needlepoint to start on a larger grid of canvas.

Anyone stitching in public is likely to get a mixture of reactions. Some people will look away, some will not even notice, but there are always a few who will come and have a look.
The lookers are obviously interested and often apologetic for disturbing you, but none of us is ever going to be annoyed by questions if we think we're going to get another person hooked on needlepoint.
The most common reaction I came across was "I could never do that". The open door. "Of course you can. If you can thread a needle you can do needlepoint", at which point I offer them a chance to try. "It won't break and you can't damage it", was part of my mantra.
I gave them the choice of stitching where I was stitching, or choosing a new colour, a new letter and a new stitch. "Choose a colour, any colour, chose a letter, any letter, chose a stitch from the stitch book."
It brought out some unusual colour combinations, but the whole point was to be colourful and noticeable.

After almost a year, this is where we are.


Each letter is a different stitch and the colours clash, but it has been fun persuading people of all ages to add a few stitches.

The current thinking is that it might be the centre piece of a banner, so I'm thinking that I may take out the small amount of background at the top right and do a skip-stitch, so that much of the canvas is left unstitched. It would reduce the weight, and it would allow the wind to pass through, making it easier to control if it is carried in a parade. I'd have to put a backing on each letter, but that's for later.

Maybe by this time next year it will be finished.

Saturday, 25 April 2020

You win some, you lose some.

I created this piece, "Boats: After Hokusai" as an entry for the RHASS (Royal Highland Agricultural Society Show) 2013. The class was "Boats, Blackwork". Being me, I started with absolutely no idea what I was doing, so as usual, I winged it.

I started from a Hokusai print of fishermen and a pleasure boat.


It was much more detailed than I wanted, so the first thing I did was to draw it out in rough, removing the figures and some of the smaller details. Having done that, I marked the shading to highlight the darker and lighter areas before transferring the outlines to graph paper.


The next step was to add in the stitching lines. The small amount of cloud at the top was obviously the darkest area, so I decided that it was the best place to begin. I chose to create a 'stitch' based on an octagon with a square in the centre. With that drawn in I could see that the lighter areas could be created using 'partial' version of the same motif.
The boats were obviously lighter in shade than the rest of the picture so I decided that they should be completed in backstitch.

When I started to put needle and thread to linen, I did at least understand that if I had to ensure that I was not drawing threads across the back as they would show through. That was quite tricky in places and I spent a lot of time weaving through the threads on the back.

It took me 90 hours to design and stitch 'Boats'. It is worked on 28 count linen and the stitched area measures 10" by 6½".

And you lose some. It came last! Was I upset? Well, I admit I was a little peeved. It was the only piece in the class that was 'original'. On the other hand, I have to admit that while practically every other piece was the same design of a galleon under full sail, they were mostly much better stitched than my entry.

And you win some. What I won was a much better understanding of blackwork.